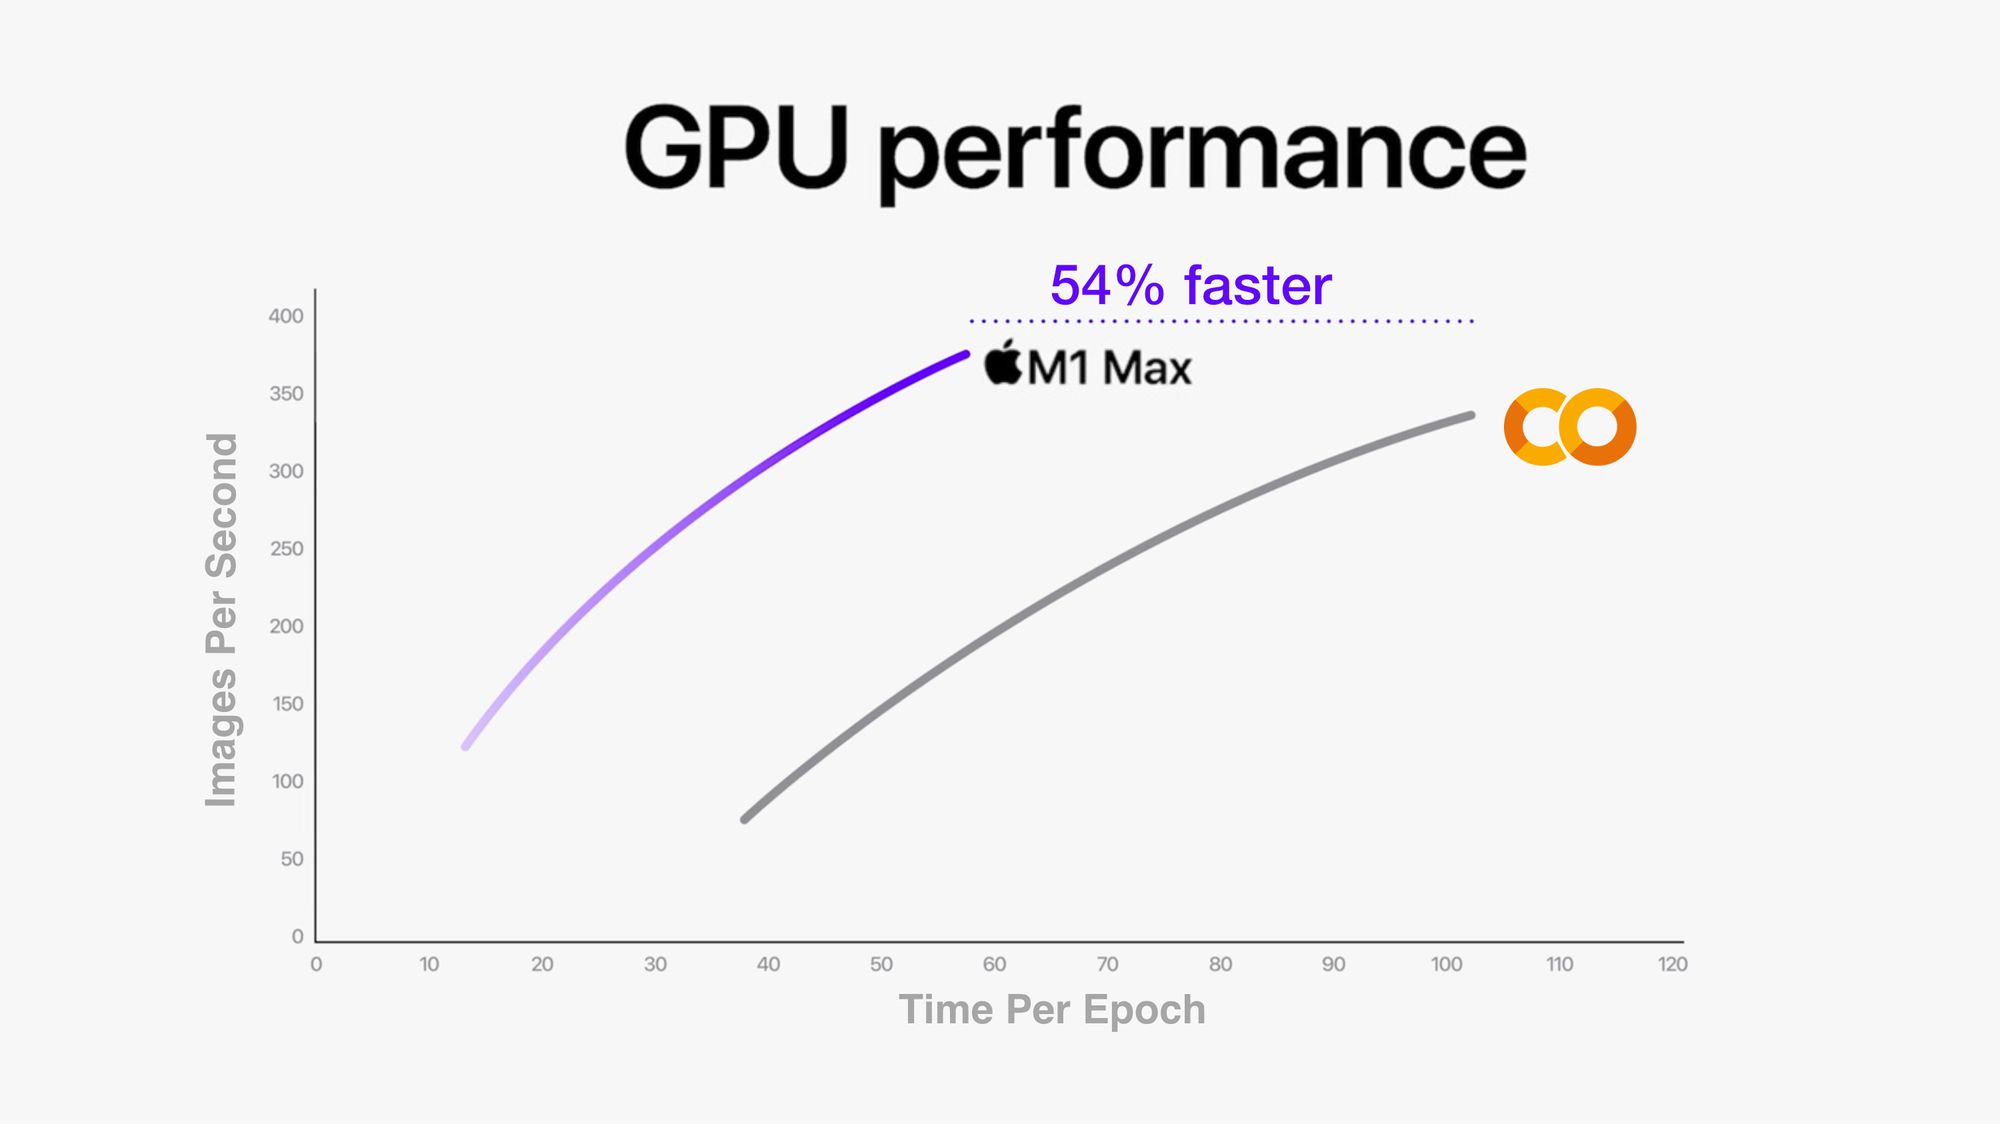
Apple’s M1 Pro and M1 Max Outperform Google Colab by up to 54%
2021 Apple M1 Pro and M1 Max Machine Learning speed test comparison.

The main keyboard I used is attached to a MacBook Pro. I'm typing this on a MacBook Pro.
And being the tech nerd I am, when Apple released a couple of new MacBook Pro's with upgraded hardware: M1 Pro, M1 Max chips and redesigns and all the rest, I decided, I better test them out.
For context, I make videos on machine learning, write machine learning code and teach machine learning.
That's what this article focuses on.
Comparing Apple's M1, M1 Pro and M1 Max chips against each other and a few other chips.
How?
Four tests:
- Final Cut Pro Export – How fast can the various MacBook Pro's export a 4-hour long TensorFlow instructional video (I make coding education videos) and a 10-minute long story video (using H.264 and ProRes encodings)?
- CreateML Image Classification Machine Learning Model Creation – How fast can the various MacBook Pro's turn 10,000 images into an image classification model with CreateML?
- CIFAR10 TinyVGG Image Classification with TensorFlow (via
tensorflow-macos) – Thanks totensorflow-metal, you can now leverage your MacBook's internal GPU to speed up machine learning model training. How does this go with a smaller model? - Food101 EfficientNetB0 feature extraction with
tensorflow-macos- I rarely train machine learning models from scratch. So how do the new M1 Pro and M1 Max chips go with transfer learning using TensorFlow code?
This article is strictly focused on performance. For design, inputs, outputs, battery life, there's plenty of other resources out there.
Hardware specs
I currently use an Intel-based MacBook Pro 16-inch as my main machine (almost always plugged in) with a 2020 13-inch M1 MacBook Pro as a take-with-me-places option.
And for training larger machine learning models, I use Google Colab, Google Cloud GPUs or SSH (connect via the internet) to a dedicated deep learning PC with a TITAN RTX GPU.
For the TensorFlow code tests, I've included comparisons with Google Colab and the TITAN RTX GPU.
The specs here focus on the MacBook Pro's, Intel-based, M1, M1 Pro, M1 Max.
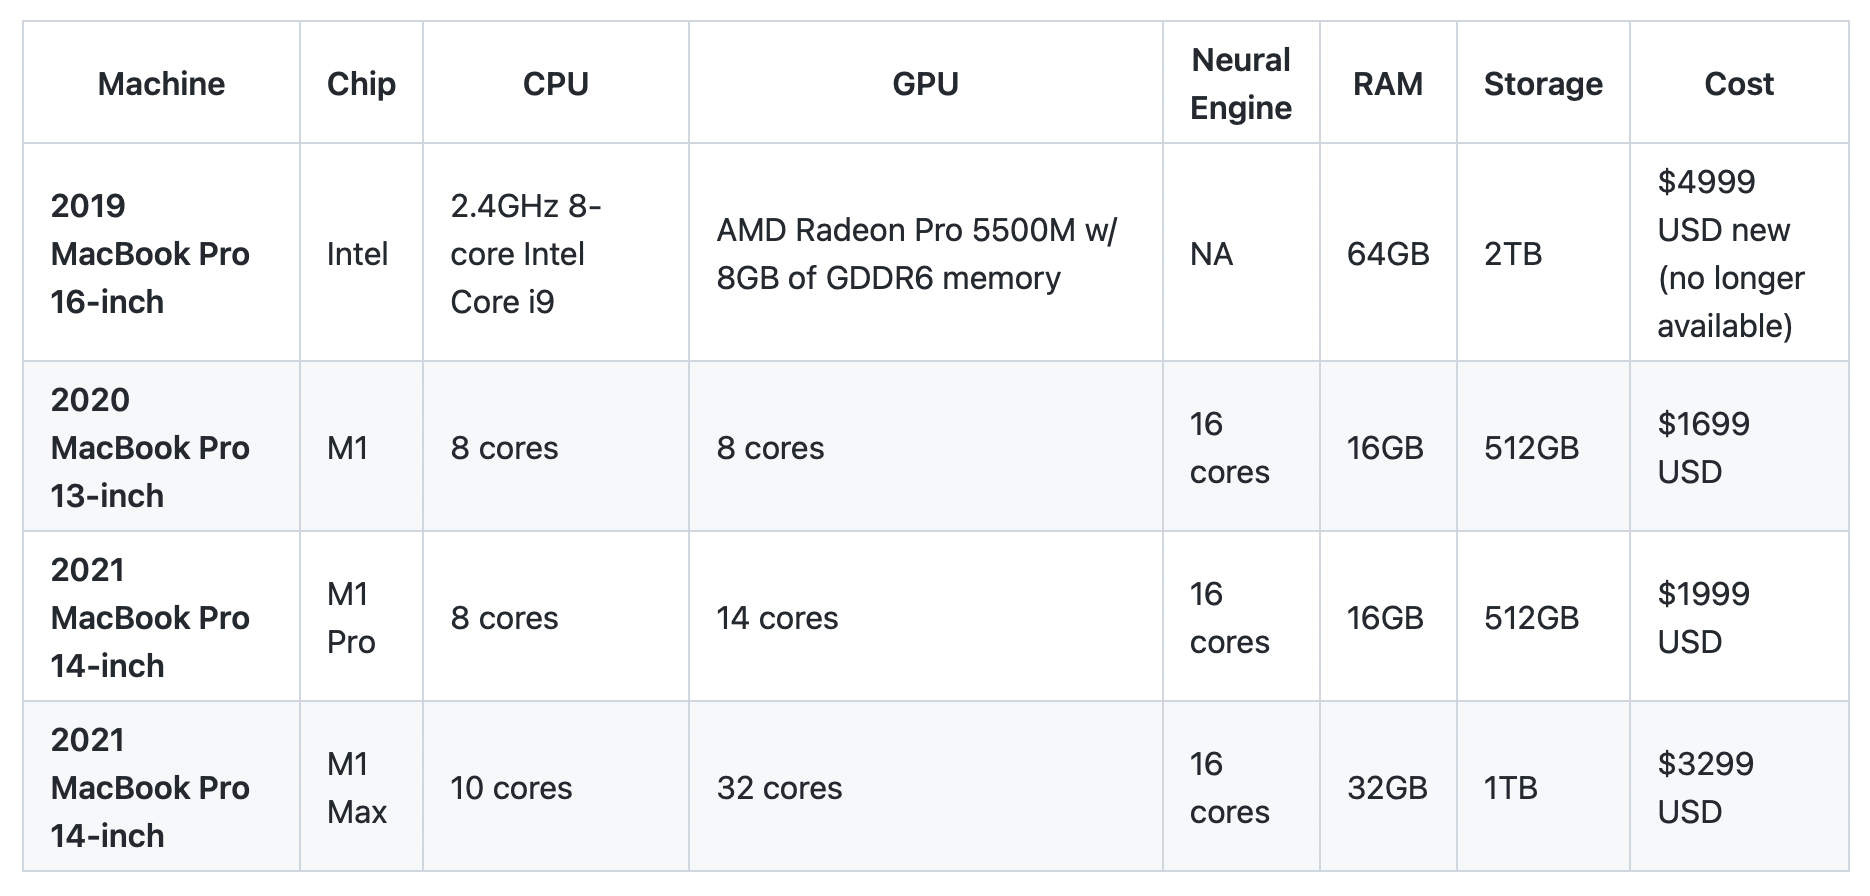
For each test, all MacBook Pro's were running macOS Monterey 12.0.1 and were plugged into power.
Experiment 1: Final Cut Pro Export (small and large video)
I make YouTube videos and educational videos teaching machine learning.
So the machine I'm using has to be fast at rendering and exporting. That's one of the main reasons I bought a spec'd out 2019 16-inch MacBook Pro, so I could edit videos without lag.
Plus, the M1 Pro and M1 Max chips are targeted at pros. Many of which edit videos at far higher quality than I do (for now).
For each video, I exported them both to H.264 encoding (higher compression, more GPU intensive) and ProRes encoding (lower compression, less CPU and GPU intensive).
This is because of Apple's statements that the newer M1 chips have dedicated ProRes engines.
Large video
Experiment details:
- Video: Learn TensorFlow for Deep Learning Part 2
- Length: 4-hours
- Style: 30x screen recordings of smaller videos (~10-minutes each) stitched together
- Quality: 1080p
| Machine | Chip | Encoding | Export time (HH:MM:SS) |
|---|---|---|---|
| 2019 MacBook Pro 16-inch | Intel | H.264 | 33:06 |
| 2020 MacBook Pro 13-inch | M1 | H.264 | 50:09 |
| 2021 MacBook Pro 14-inch | M1 Pro | H.264 | 2:00:26 |
| 2021 MacBook Pro 14-inch | M1 Max | H.264 | 2:02:29 |
Interesting to see the newer M1s (Pro and Max) take over double the time of the base M1 and nearly four times as long as the Intel-based Mac when using the H.264 encoding.
It should also be noted that large amounts of hardware were left idle on both the M1 Pro (~89% idle) and M1 Max (~68% idle) when using the H.264 encoding.

Potentially a software update may be required to leverage the full power of the newer chips?
It was a different story for the ProRes encoding though.
| Machine | Chip | Encoding | Export time (HH:MM:SS) |
|---|---|---|---|
| 2019 MacBook Pro 16-inch | Intel | ProRes | 33:24 |
| 2020 MacBook Pro 13-inch | M1 | ProRes | 30:26 |
| 2021 MacBook Pro 14-inch | M1 Pro | ProRes | 12:10 |
| 2021 MacBook Pro 14-inch | M1 Max | ProRes | 11:24 |
The ProRes encoding is where the newer M1 chips really shined.
In comparison to the H.264 encoding, huge amounts of CPU usage occurred when exporting to ProRes on both the M1 Pro and M1 Max. Perhaps this is from the dedicated ProRes cores?
However, even though the ProRes encoding export happened far quicker than H.264, the difference in file size makes it almost unusable for many.
The file size when exporting the large video to H.264 turned out to be 7GB and when exporting to ProRes was 167GB.
I don't know about your internet speed but that kind of video would take three or four days to upload for me.
Small video
The smaller video resulted in far closer results.
Experiment details:
- Video: How I study machine learning 5 days per week
- Length: 10-minutes
- Style: Voiceover with video clips edited to the voice
- Quality: 1080p
| Machine | Chip | Encoding | Export time (HH:MM:SS) |
|---|---|---|---|
| 2019 MacBook Pro 16-inch | Intel | H.264 | 2:59 |
| 2020 MacBook Pro 13-inch | M1 | H.264 | 3:48 |
| 2021 MacBook Pro 14-inch | M1 Pro | H.264 | 3:28 |
| 2021 MacBook Pro 14-inch | M1 Max | H.264 | 3:31 |
Very similar export times here across the board.
But again there was plenty of hardware left idle on the M1 Pro and M1 Max chips when exporting to the H.264 encoding.
| Machine | Chip | Encoding | Export time (HH:MM:SS) |
|---|---|---|---|
| 2019 MacBook Pro 16-inch | Intel | ProRes | 2:35 |
| 2020 MacBook Pro 13-inch | M1 | ProRes | 2:41 |
| 2021 MacBook Pro 14-inch | M1 Pro | ProRes | 1:09 |
| 2021 MacBook Pro 14-inch | M1 Max | ProRes | 1:05 |
The M1 Pro and M1 Max really shine through again when using the ProRes encoding. Checking Activity Monitor showed huge amounts of CPU usage, ~350-450% for the M1 Pro and ~300-500% for the M1 Max.
Experiment 2: CreateML Image Classification
CreateML is a machine learning app made by Apple that comes with Xcode (Apple's software for making iOS and macOS apps).
It provides an easy way to turn data into machine learning models.
I tried it because my brother and I have been using it for prototype models on Nutrify (an app to take a photo of food and learn about it).
Not only does it work well for our use case, it produces trained models which are optimized for Apple devices.
Experiment details:
- Data: Random 10% subset of all Food101 classes (~7.5k train images, ~2.5k test images)
- Training: 25 epochs, all data augmentation settings on
- Model: CreateML powered model (Apple doesn't tell you what architecture is being used)
| Machine | Chip | Num Epochs | Total training time (mins) |
|---|---|---|---|
| 2019 MacBook Pro 16-inch | Intel | 25 | 24 |
| 2020 MacBook Pro 13-inch | M1 | 25 | 20 |
| 2021 MacBook Pro 14-inch | M1 Pro | 25 | 10 |
| 2021 MacBook Pro 14-inch | M1 Max | 25 | 11 |
And once again, there wasn't a large difference between the M1 Pro and M1 Max. Though both of them did very much outperform the other chips.
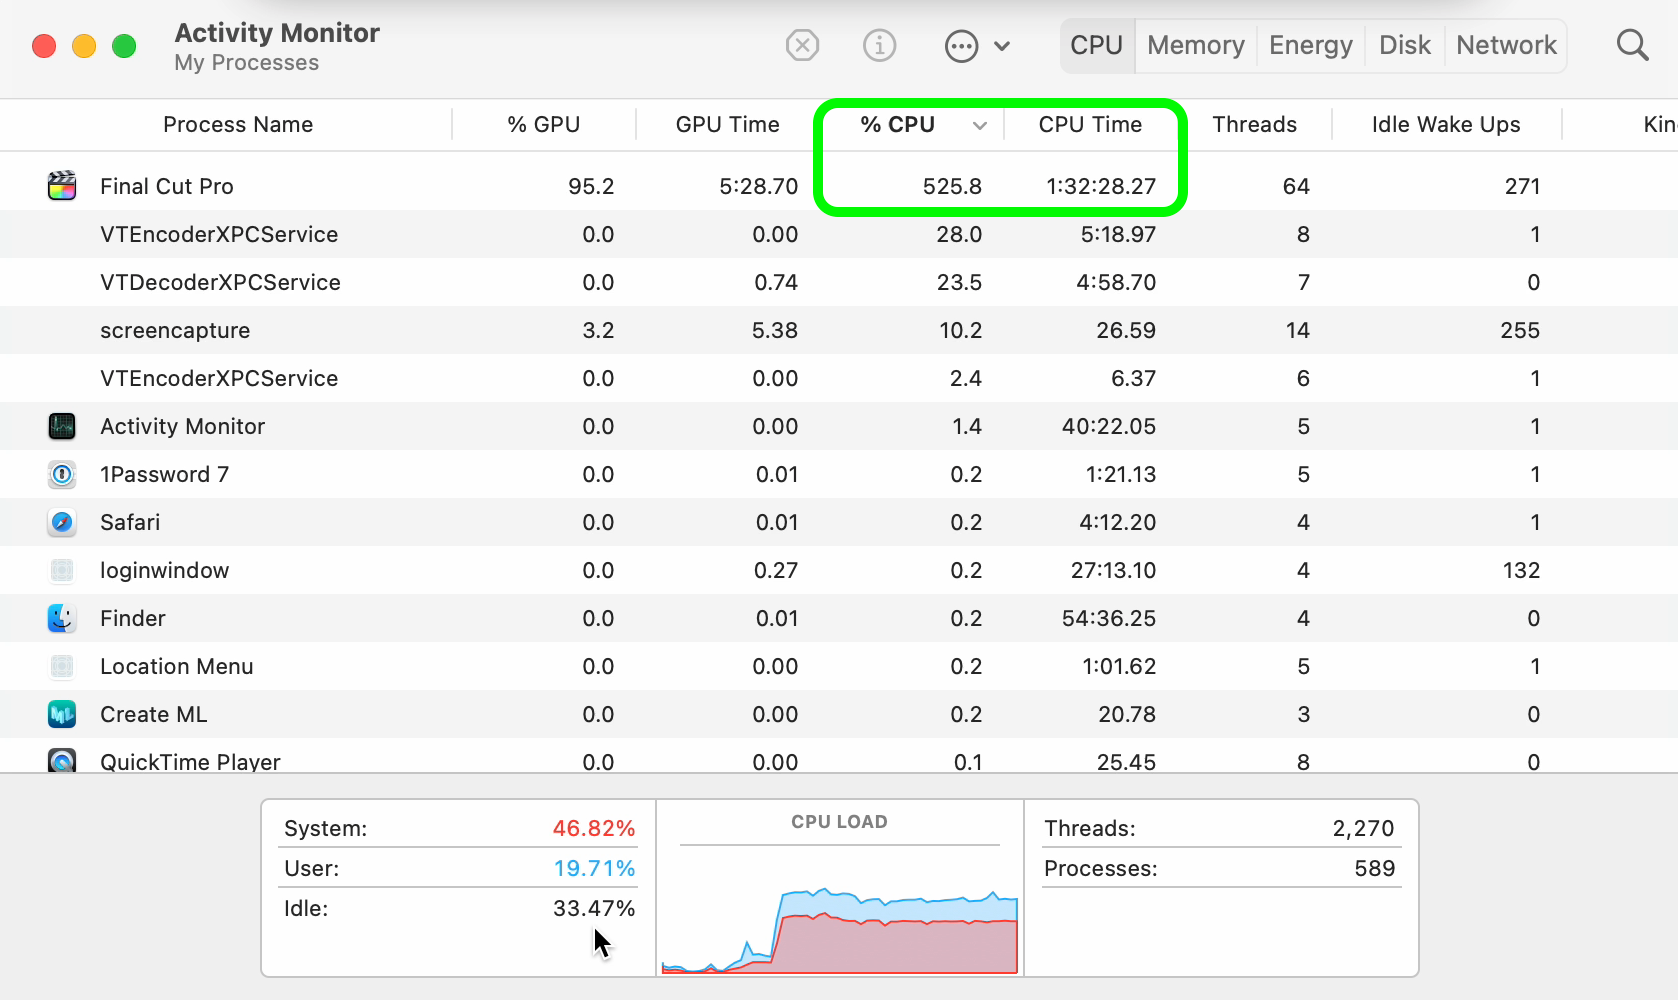
During training, checking Activity Monitor for the M1 Pro and M1 Max showed large amounts of CPU usage under the process name "MLRecipeExcecutionService".

Notably, the GPU didn't get much usage at all during training or feature extraction.
This leads me to believe that CreateML uses 16-core Neural Engine to accelerate training. However, this isn't 100% confirmed since Activity Monitor doesn't disclose when the Neural Engine kicks in.
Now CreateML doesn't reveal what kind of model it uses either. Judging by the performance, my guess is it would be using at least a pretrained ResNet50 model or EfficientNetB2 and above or similar.
Experiment 3: CIFAR10 TinyVGG Model with TensorFlow Code
CreateML works fantastic but sometimes you'll want to be making your own machine learning models.
For that, you'll probably end up using a framework like TensorFlow.
I teach TensorFlow and code it almost every day. So I was excited to see how the new machines would perform here.
For all of the custom TensorFlow tests, all machines ran the same code with the same datasets with the same environment setup.
The only difference was between Google Colab and the Nvidia TITAN RTX versus each of the Macs.
Each of the Macs ran a combination of tensorflow-macos (TensorFlow for Mac) and tensorflow-metal for GPU acceleration. Whereas Google Colab and the Nvidia TITAN RTX used standard TensorFlow.
You can see the code for all experiments and TensorFlow on Mac setup on GitHub.
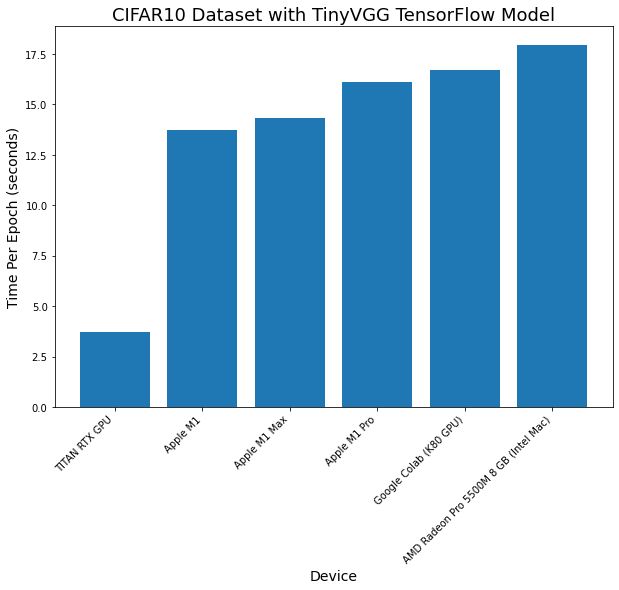
First TensorFlow experiment details:
- Data: CIFAR10 from TensorFlow Datasets (32x32 images, 10 classes, 50,000 train, 10,000 test)
- Model: TinyVGG (from CNN Explainer website)
- Training: 10 epochs, batch size 32
- Code: See it on GitHub
| Machine | Chip | Num Epochs | Total time (seconds) | Time per epoch (average, seconds) |
|---|---|---|---|---|
| 2019 MacBook Pro 16-inch | Intel | 10 | 180 | 18 |
| 2020 MacBook Pro 13-inch | M1 | 10 | 137 | 14 |
| 2021 MacBook Pro 14-inch | M1 Pro | 10 | 161 | 16 |
| 2021 MacBook Pro 14-inch | M1 Max | 10 | 143 | 14 |
| Google Colab* | Nvidia K80 GPU | 10 | 167 | 17 |
| Custom Deep Learning PC | Nvidia TITAN RTX | 10 | 37 | 4 |
*For experiments, I use the free version of Google Colab, a fantastic offering from Google to use a Jupyter Notebook connected to a GPU with very little setup. The free version used to offer faster GPUs (Nvidia P100, T4), however, it's been a while since I've gotten access to one of those. You can get faster GPUs via Colab Pro but that isn't available where I live (Australia) yet.
It makes sense that the TITAN RTX outperformed the rest of the machines. It's a GPU purpose-built for machine learning and data science.
All of the Macs performed more or less within the same range in terms of time per epoch. With the M1 Max and plain M1 machines running the code in similar times.
Checking Activity Monitor for each of the M1 Macs saw a large amount of GPU usage during training. This is thanks to Apple's tensorflow-metal PluggableDevice, a software package to leverage Apple's Metal GPU framework to accelerate TensorFlow.

tensorflow-metal. Screenshot from M1 Pro.Experiment 4: Food101 EfficientNetB0 Feature Extraction with TensorFlow Code
The final machine learning experiment went larger scale. Using more images and larger images than Experiment 3.
One of the best ways to get fantastic results when training machine learning models is to use transfer learning.
Transfer learning leverages the weights (patterns) one model has learned on a similar dataset and allows you to use them for your own dataset.
For Experiment 4 I used transfer learning with an EfficientNetB0 model on the Food101 dataset.
Experiment details:
- Data: Food101 from TensorFlow Datasets (224x224 images, 101 classes, ~75k train, ~25k test)
- Model: EfficientNetB0 pretrained on ImageNet with top layer replaced (feature extraction)
- Training: 5 epochs, batch size 32
- Code: See it on GitHub
| Machine | Chip | Num Epochs | Total time (seconds) | Time per epoch (average, seconds) |
|---|---|---|---|---|
| 2019 MacBook Pro 16-inch* | Intel | 5 | 3032 | 606 |
| 2020 MacBook Pro 13-inch | M1 | 5 | 3387 | 677 |
| 2021 MacBook Pro 14-inch | M1 Pro | 5 | 1486 | 297 |
| 2021 MacBook Pro 14-inch | M1 Max | 5 | 959 | 192 |
| Google Colab | Nvidia K80 GPU | 5 | 2122 | 424 |
| Custom Deep Learning PC | Nvidia TITAN RTX | 5 | 464 | 93 |
*The code run on the 16-inch MacBook Pro used the SGD optimizer instead of the Adam optimizer due to an unresolved issue with tensorflow-macos running on an Intel-based Mac I couldn't find the fix to.
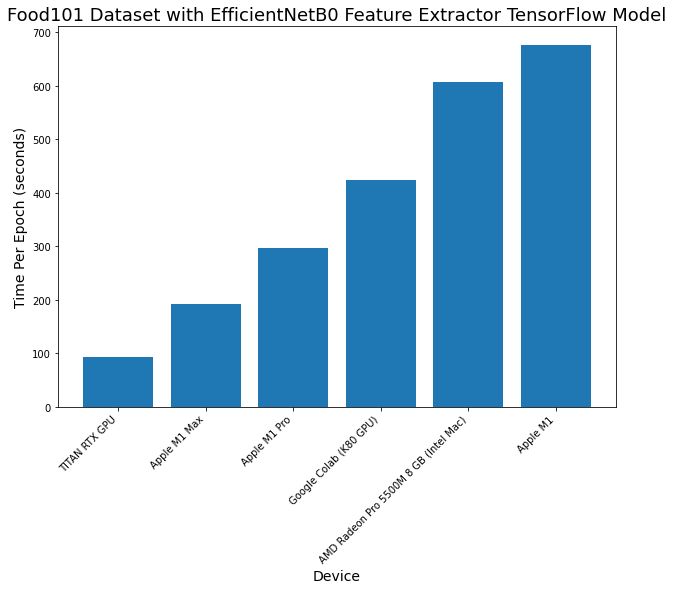
What stands out most to me here is how performant the M1 Pro and M1 Max are when scaling up to larger experiments.
Experiment 3 saw similar results across all Macs but when the amount of data is increased (both in image size and number of images), the M1 Pro and M1 Max pull far ahead of the other Macs.
The M1 Pro and M1 Max even outperform Google Colab with a dedicated Nvidia GPU (~1.5x faster on the M1 Pro and ~2x faster on the M1 Max).
This means you could machine learning experiments on your local machine faster than you could with an online Colab notebook. Giving you all of the benefits of running locally. Though, Google Colab does give you the fantastic ability to share notebooks with a link.
And of course, the TITAN RTX performs the best but the M1 Max isn't far behind, which is very impressive for a portable device.
Activity Monitor showed plenty of GPU usage across all devices.
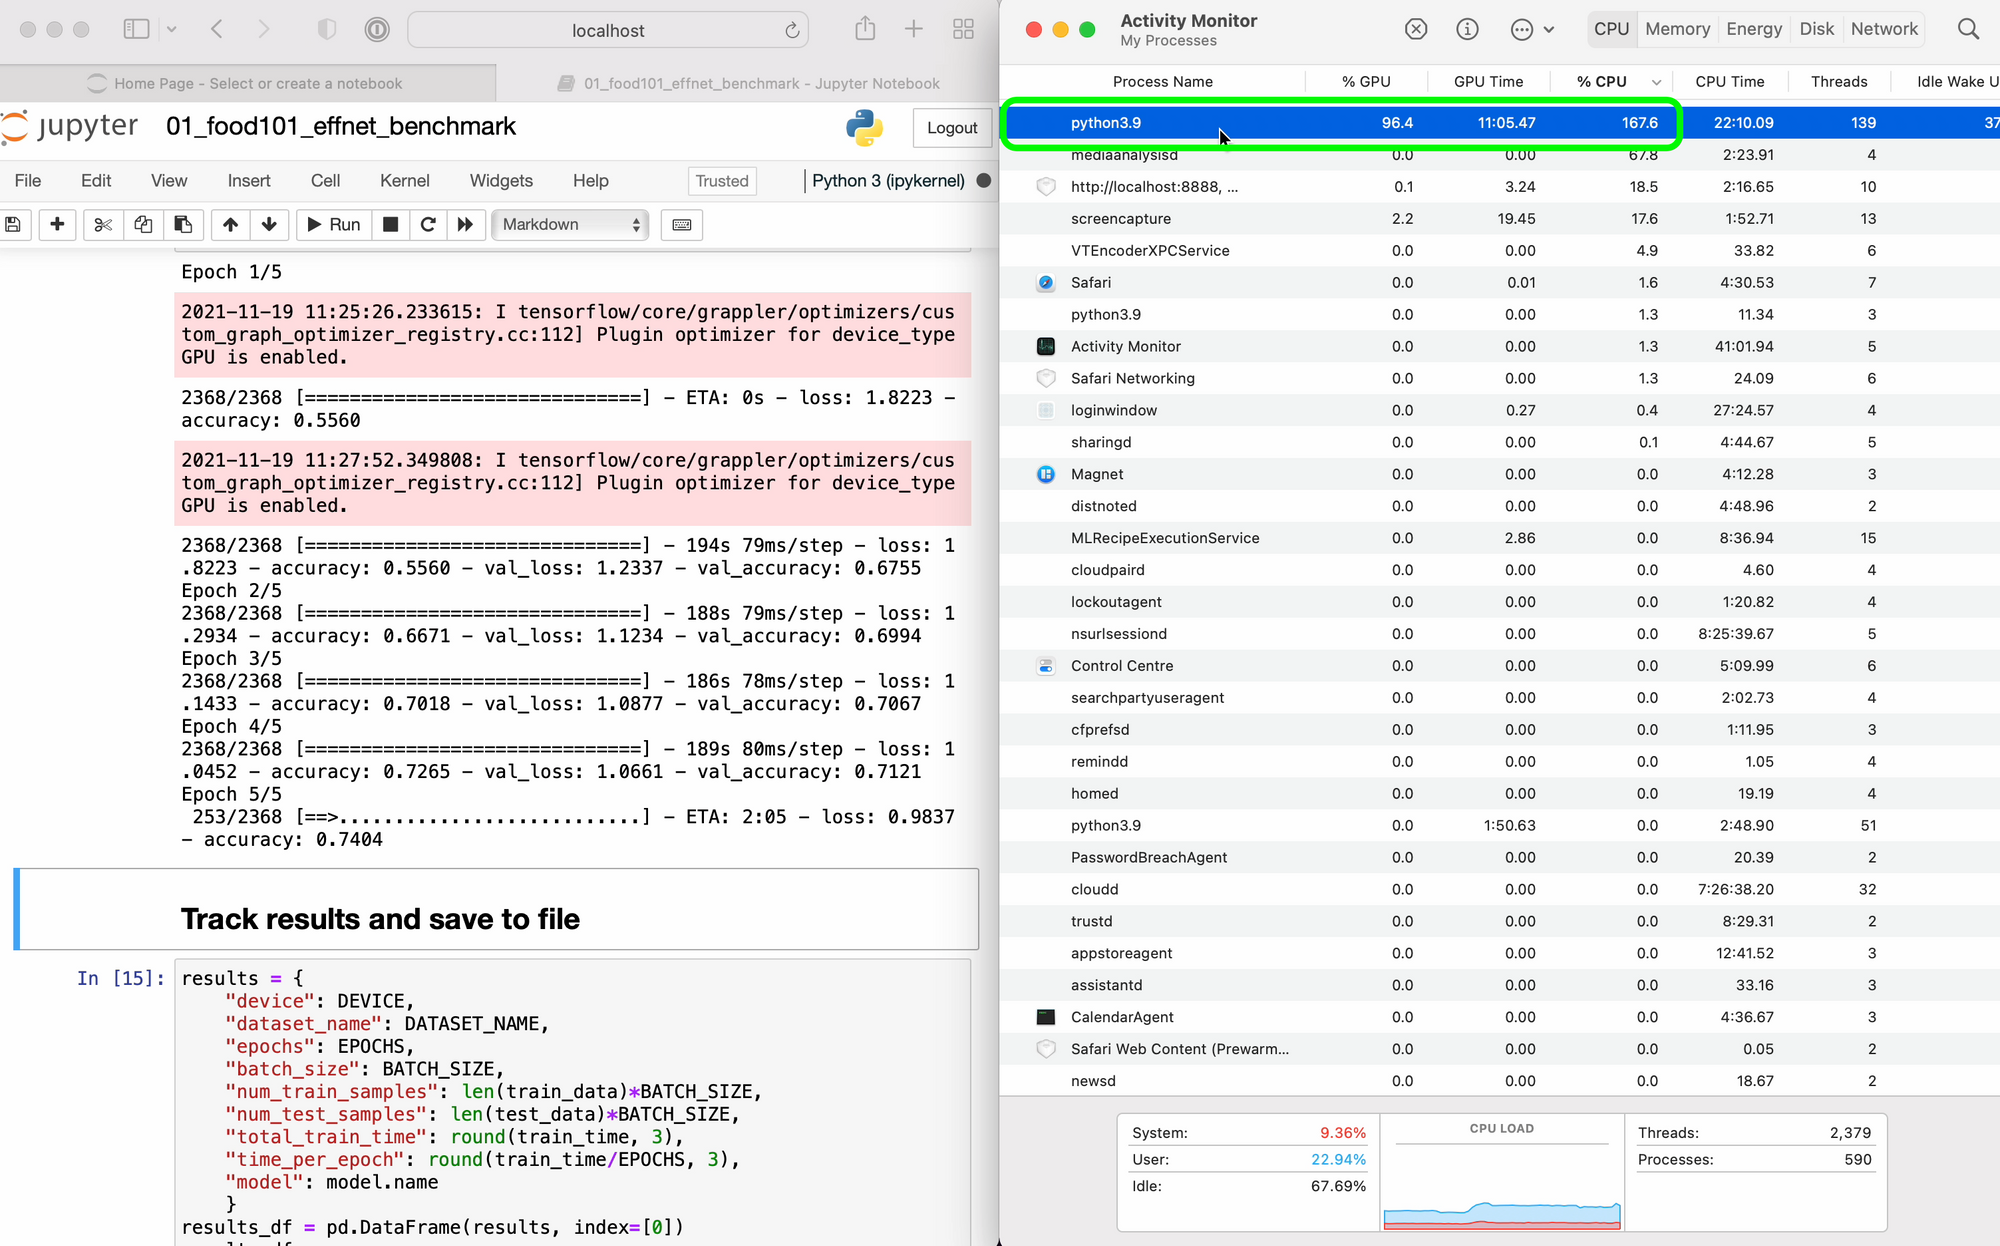
tensorflow-metal. It would be cool to see the Neural Engine come into play here though. The training on CreateML was very fast. I wonder if that could be leveraged for custom code. Screenshot from M1 Max.Which one should you buy?
I've been using a 13-inch M1 MacBook Pro every day for the past year. I use for it for small-scale machine learning experiments, video editing and Google Colab browsers.
However, I'm now considering upgrading to a 14-inch MacBook Pro with the M1 Pro and doing everything locally (no more Google Colab) before scaling up on the TITAN RTX or cloud when I need.
From the tests, it's clear the 13-inch M1 MacBook Pro (and although not tested here, the M1 MacBook Air should still perform close to the M1 MacBook Pro results) is still an incredible laptop to start out on.
Though if you've got the budget, the M1 Pro will give you a noticeable performance boost.
As for the M1 Max, my tests struggle to justify the $1100USD price gap between it and the base M1 Pro. For me, I'd rather spend the money on extra local storage, RAM or put it toward a dedicated GPU.
In short, these are my recommendations:
- 13-inch M1 MacBook Pro/MacBook Air — Still a fantastic laptop for beginner machine learning and data science.
- 14-inch M1 Pro MacBook Pro — Noticeable performance boost from M1, worth it if you enjoy the new design or have the budget.
- 14-inch M1 Max MacBook Pro — Noticeable performance boost from M1 Pro only at large-scale model training, many other performance benchmarks hit the same levels as the M1 Pro. This may be an option if you find yourself often editing multiple streams of 4K video.
Conclusion
I'd like to see where and when Apple's dedicated chips are being used.
For example, it'd be cool to see when the Neural Engine comes into play. Such as when using CreateML (all M1 machines sped through training here like no tomorrow).
Or even better, how one could write code to leverage the neural engine themselves?
Last year, I said how about a 16-inch MacBook Pro with an M2 and Apple delivered an M1 Max. Perhaps the M2 is still on the way in the form of a Mac mini or new iMac.
If anything is clear, dedicated chips for certain purposes seem to be the trend. And the performance benefits speak for themselves.
Resources
- See all of the code used for the testing and evaluation on GitHub.
- See my video on how to setup your new M1 machine for machine learning and data science.
- Watch a video version of this blog post on YouTube.